ChatGPT Storage Full? How to Delete Library Files
When ChatGPT says your file library is full and new files are no longer saved, the cause is usually the Library: the place where every image ChatGPT generates and every file you upload is kept. The fix is to delete old files from the Library. Delete a few by hand, or use a Chrome extension to delete hundreds in bulk.
The message usually reads:
Your file library is full. New files won’t be saved to your library, but you can still use them in this chat. To store new files for later, free up space or upgrade your storage.
So files you add still work in the current chat, but they are not kept in your Library for later. ChatGPT offers Get Pro for more storage, or View library to free up space yourself, which is what this guide covers.
Why ChatGPT runs out of storage
Each time ChatGPT draws an image for you, that image is saved. Each time you drop a PDF, spreadsheet or screenshot into a chat, that file is kept too. All of it ends up in the Library and counts toward your account’s storage.
Heavy image users fill up fastest: one request often produces several images, each a few MB. After a few months the Library can hold a thousand files without you noticing.
Note: deleting a chat does not empty the Library. The files stay there until you delete the files themselves.
Step 1: see what’s using the space
Open chatgpt.com/library on a computer. Images and files are listed by date, newest first. Look for:
- Images you regenerated many times for the same idea. Usually only the final one is worth keeping.
- One-off uploads: receipts, screenshots, documents you’ve finished with.
- Very old files from projects that are done.
Before deleting, download anything you want to keep.
Step 2a: delete files one by one (a few dozen files)
In the Library, open each file and delete it. Nothing to install, and it’s the right choice when you only have a few dozen files or want to look at each one before it goes.
The downside: with a few hundred files you’ll be clicking a few hundred times, and you can’t tell in advance how much space you’ll get back.
Step 2b: bulk delete with a Chrome extension (hundreds of files)
The Bulk delete ChatGPT Library files extension is free and works in Chrome, Edge, Brave and other Chromium-based browsers on a computer.
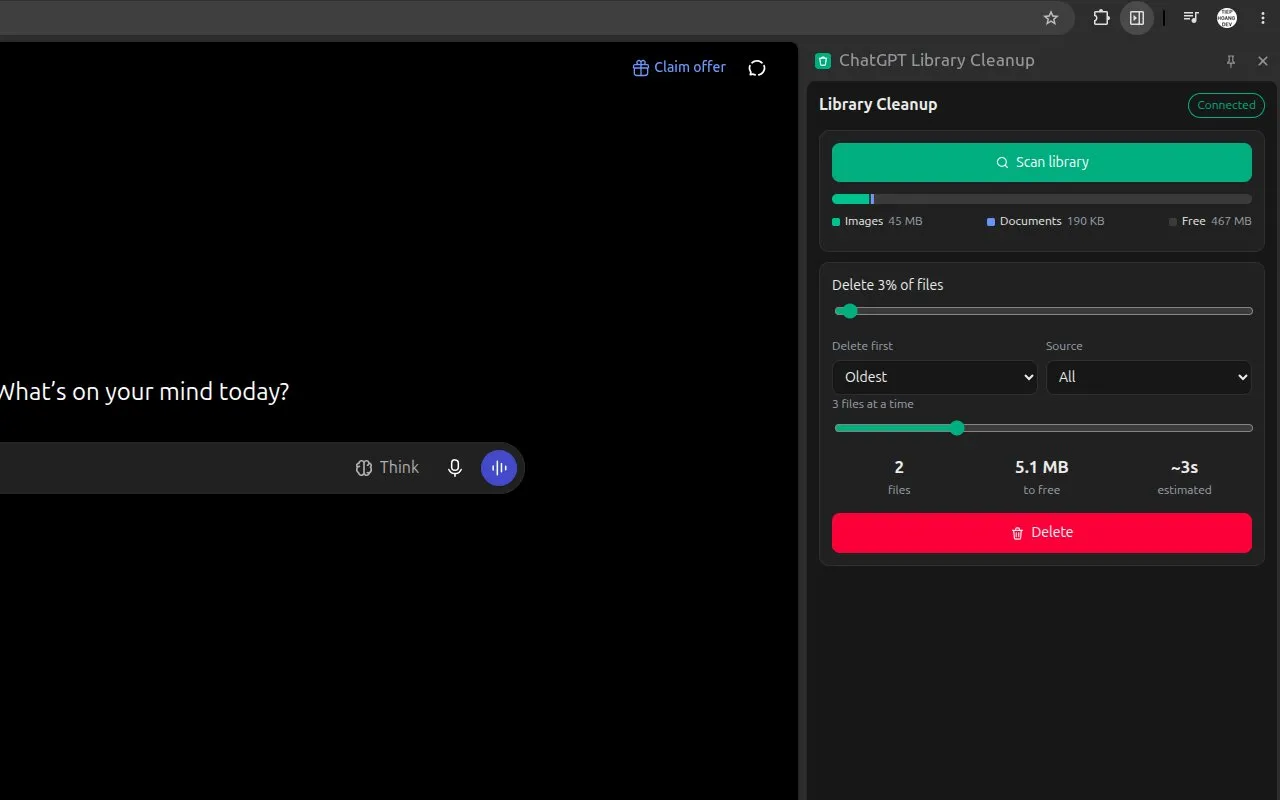
- Install it from the Chrome Web Store, then open chatgpt.com/library and sign in as usual.
- Click the extension icon to open the side panel, then click Scan library. It counts every file and shows how much space images and documents use.
- Drag the slider to choose what percentage to delete. Under Delete first, pick:
- Oldest: clean up gradually from the oldest files. The safest choice the first time.
- Largest: get the most space back with the fewest files.
- Newest: when you just generated a batch of images you won’t use.
- Under Source, choose only images ChatGPT generated, only files you uploaded, or all.
- Check the file count, space to free and estimated time, then click Delete twice to confirm. You can click Stop at any time.
The extension has no server and needs no account. It runs only on chatgpt.com with the session already signed in to your browser, so your data doesn’t go anywhere else.
Can you get deleted files back?
Deleted files (by hand or with the extension) go to ChatGPT’s trash, and the storage is freed right away. Still, don’t treat the trash as a backup: download anything important first.
Keeping the Library tidy
- After generating images, download the one you like and delete the drafts.
- Once a month, scan again and delete the oldest 10–20% of files.
- If downloaded images are too heavy to share, compress them first.